

Creating a Real-time Data Stream Using Apache Kafka in Python
A beginner-level tutorial on setting up Kafka with python in windows 10


Real-time data streaming has many use cases. You could monitor data from IoT devices, research instruments, weather systems, telescopes, etc. You can also monitor and analyze online content like a live stream of tweets.
Once you have created your data pipeline, you can analyze it and create logic to take action in your application. For example, you could send the data to a deep learning model to predict or classify something in real-time. You can create feedback and live training loops. You can also set alerts to monitor some conditions.
Here’s what I want to do in this tutorial 📗
Use Apache Kafka with Python 🐍 in Windows 10 to stream any real-time data 📊
Once we understand how to set up this flow, we can use any data source as input and stream it and then do whatever we want.
Before we start, let us explore some quick FAQs for basic context.
What is Apache Kafka 🤔?
In simple terms, it is a streaming platform that is highly scalable, durable, and available. If you want to stream data in any scenario, you can consider using Kafka.
Let us do one better :P Why Kafka 🤔?
I don’t want to go too deep into it, but if you want to explore more, Confluent has an excellent article.
Likewise, there are scenarios where Kafka may not be the best to use. Just mentioning as something to keep in mind and do our research when we are solving real-world problems.
Let us keep things simple and beginner-friendly in this article to help you get started. You should be able to follow along even if you are an absolute beginner in programming and computer science. You can focus more on the logical flow. Think of each module or function here as a black box and how you can use them to bring your logic to life.
🖥️ Phase 1: Setting up your development environment
It is not very straightforward to use Kafka in a Windows system. You will need something called WSL 2 (Windows Subsystem For Linux). It helps you run a Linux environment on your Windows PC where you can run Kafka.- You can set up WSL 2 following the steps in this blog. Follow them till the installation of Java in the Linux terminal.
- If the Linux kernel update package doesn’t install properly, you can restart your system and try again. It should work then.
- After installing Java, follow the below steps.
- Use this blog post reference to installing Kafka. You can download the latest version using the wget command. Follow the steps in the article till the second step to start your Kafka server.
- Remember that all the terminals you open must be Linux terminals. You will have one terminal running for the Zookeeper server and one for Kafka. You have to keep them running. For now, we need not worry about what’s happening here.
- Open another new terminal and cd to the folder where Kafka is extracted to. Run the below command to create a new “topic” called data-stream. The topic name could be anything. For demonstration purposes, I will be sharing a simple example. We will be using this topic as a reference to stream our data.
$ bin/kafka-topics.sh --create --topic data-stream --bootstrap-server localhost:9092Python setup for Kafka
- Python is already preinstalled in the Linux environment. However, we need to install some other stuff to use Kafka in Python.
- Open another new Linux terminal.
- Install pip.
$ sudo apt install python3-pip - Install venv. Using separate virtual environments for each of your python projects is recommended. venv helps us do the same.
$ sudo apt install python3-venv - Now create your project directory and go to that path using the cd command. Let’s call the project as kafka-stream.
$ mkdir kafka-stream $ cd kafka-stream/ - Run the below command to create a new python environment in this directory. Let us name it .kafka.
$ python3 -m venv .kafka - Activate this new environment.
$ source .kafka/bin/activate - Install kafka-python in this environment.
$ pip install kafka-python - You can use the VS Code you may have already installed in your windows system. Refer to this blog post for more details. You can follow the instructions under the “Setup Visual Studio Code” subheading. You will need to install the Remote-WSL extension as mentioned.
- Next, run the below command in the terminal (while inside your project directory) to open your project folder in VS Code. You must notice at the bottom-left that the VS Code is connected to your Linux environment.
We are all set to write some code now. Make sure that you are in the correct project directory in VS Code. You should also see one subfolder in it for the virtual python environment we created before.$ code .
🖥️ Phase 2: Streaming Data
For now, we just need to know two things about Kafka:- A producer is something that produces data. Pretty straightforward. The producer is where we fetch the data and send it to the Kafka cluster in real time.
- A consumer reads the data sent by the producer. Here, we can do whatever we want with the data we keep receiving from the producer.
Let us create our producer and consumer in python using the kafka-python library.
Before that, we have to decide what data we want to stream. You can get data from anywhere you want.
- A remote or local database
- An API endpoint
- A web socket
In this example, I thought of using an API endpoint of Coinbase to fetch the live price of Bitcoin. We can then stream the price of Bitcoin.
Here’s my producer.py.
from kafka import KafkaProducer
from time import sleep
import requests
import json

# Coinbase API endpoint
url = 'https://api.coinbase.com/v2/prices/btc-usd/spot'

# Producing as JSON
producer = KafkaProducer(bootstrap_servers=['localhost:9092'],
value_serializer=lambda m: json.dumps(m).encode('ascii'))

while(True):
    sleep(2)
    price = ((requests.get(url)).json())
    print("Price fetched")
    producer.send('data-stream', price)
    print("Price sent to consumer")
Note the following:
- You have to
pip install requestsif it is not installed already. - We are defining the producer using KafkaProducer method. Using the value_serializer method, we set the producer to send the value as a JSON.
- We are fetching the price JSON object using the requests library. You can refer to this blog if you are unfamiliar with the requests library.
- We are running an infinite while loop where the API call is made every 2 seconds, and the latest price of Bitcoin is fetched. This price is then sent to the consumer in real-time. Notice that we are using data-stream as the topic, which the consumer can identify to read this data.
- Similarly, instead of price, you can put any data you want. For example, you can make an API call to fetch the latest tweets under some hashtag. You can also load a dataset, an excel, or a CSV file into a pandas data frame and loop through all the rows to send it to the consumer (If it is a huge dataset, you can load and loop in small chunks).
- I recommend using JSON, but you can send data in other formats by setting the appropriate configuration. For more info, you can refer to the official documentation of kafka-python.
Here’s my consumer.py.
from kafka import KafkaConsumer
import json

# Getting the data as JSON
consumer = KafkaConsumer('data-stream',
bootstrap_servers=['localhost:9092'],
value_deserializer=lambda m: json.loads(m.decode('ascii')))

for message in consumer:
    price = (message.value)['data']['amount']
    print('Bitcoin price: ' + price)
Note the following:
- We have defined the consumer using the KafkaConsumer method.
- value_deserializer needs to be set as per the data we are receiving. Here, it is set for JSON.
- message.value contains the actual JSON object received. You can filter it further to get the field you want. So, you must know the JSON structure beforehand. The price value is stored under the “amount” parameter in this case.
- Once you read the data in your consumer, you can do anything with it. For example, you can extract some variables from this data and pass it on to a deep learning model to predict something and print your prediction.
- You could write some logic and send an alert if some conditions are met. You could also plot the data as a graph on some web page to get a real-time graph.
- What you can do is limited by your imagination.
Now, you should run both the producer and the consumer in separate terminals. You can open these terminals as split terminals in VS Code itself and then use the python run command.
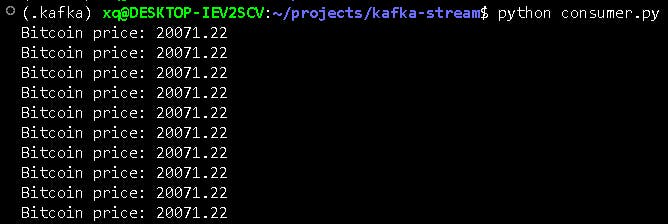
Note that the other terminals for Zookeeper and Kafka servers need to be running in the background. In the example we explored, the output will look something like this.python producer.py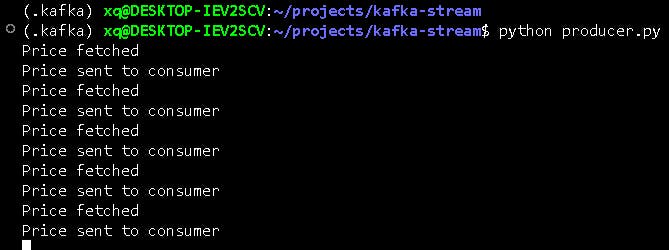
To stop the execution in all the terminals, you can usectrl + c. After running your tests and tinkering with your code, you can run the below command if you want to delete any of the events and data in your Kafka environment.
I plan to write another tutorial with a slightly more advanced use case and use deep learning models with streaming data. I will update it here once it is done. #StayTuned$ rm -rf /tmp/kafka-logs /tmp/zookeeper
Note: If you notice any errata in my understanding, feel free to reach out and let me know of the same, and I will update the blog post accordingly. This article was first published on Medium here.